The standing rigging on Calypso (the wires that hold the mast up) was 10 and 11 years old and it had been 3 years since we had it professionally inspected (we would have done it last year but for Covid). In addition we had become aware of an inherent defect affecting the Moody S38 (at least those of the age of ours) whereunder the forestay attachment on more than one S38 had snapped off due to a design fault. We needed to get this rectified urgently as this could lead to a dismasting and, without wanting to be over dramatic – that could prove fatal.
TEDIUM WARNING – Moody S38 owners might just find this interesting………
The stem head fitting on the S38 comprises a double bow roller of a good thick stainless steel construction. It is bolted down to the deck and extended forward over, and bolted into, the bow.
Its sturdiness gives a degree of confidence and is typical of Moody quality (our earlier analogy is that this is a BMW of the seas, even if not M Class!)
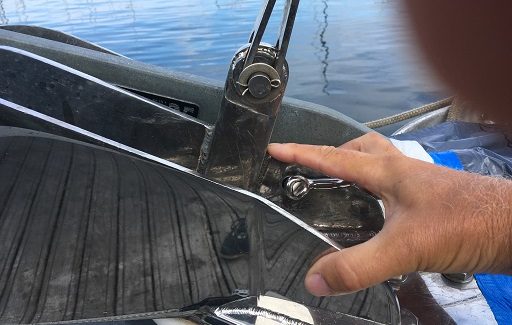
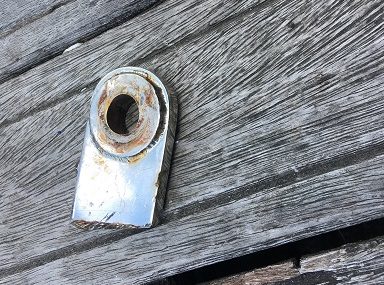
However, even BMW occasionally has a recall, and we got ours via forum posts within the Moody Owners’ Association. We were advised that on more than one S38 the tang that is welded to the central web of the stemhead fitting had snapped off along the line indicated by Paul’s finger in the photo.
For the non-sailors who for some strange reason are reading this (Mum!) the forestay is a length of wire running from near the top of the mast to the bow, terminating as shown in these photos.
The front sail (genoa) flies from this wire. Ours is over 400 square feet (the size of a one bedroomed flat) and so when filled with wind you can imagine the lateral forces that play on the forestay.
And it seems that the tang, a narrow piece of steel standing above the central web of the bow fitting, is not man enough to take this strain forever – repeated lateral stresses eventually lead to metal fatigue and failure. Clearly this could be sudden and catastrophic and so as soon as we heard about it we had to sort the problem.
As a temporary failsafe measure, to make us feel safe whilst travelling to get the work done, we attached a high tension Witchard shackle just behind the tang and “tied” the forestay to that using dyneema cord (with chafe protection).
Fortunately we didn’t need to use that for long before having work carried out at Sanxenxo.
Over the Covid layup Paul had looked at the MOA forum posts and corresponded with a fellow owner who had already rectified the problem.
Effectively the tang needs to be cut off level with the top of the central stemhead web and a new hole cut through the double thickness of the central web and remainder of the tang for the forestay to be attached to, using a longer rigging connector to make up for the lost tang.
The fellow Moody owner had kindly sent dimensions for a piece that had been bespoke machined for him by a friend to fit between the new attachment point and the bottom of the Furlex 300s furling drum.
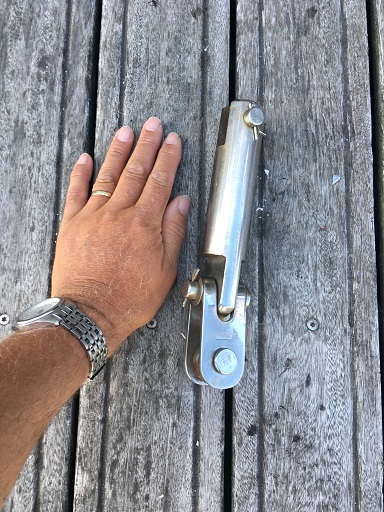
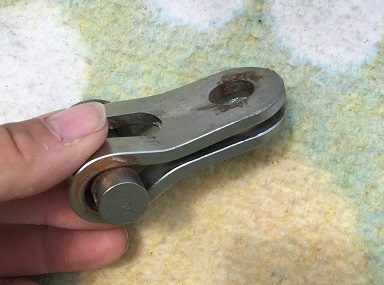
And during our Covid layoff we acquired the pictured rigging connector from eBay, the Hood (quality make) toggle of which having the correct dimension to span the double thickness steel webbing.
The remaining dimensions looked somewhere near but it wasn’t guaranteed to fit ….. however at £20 including postage, versus the £260/300 cost of new parts, purchasing it was worth a risk!
During our first visit at Sanxenxo Servi Nauta’s riggers, Francisco and Luigi had looked at the problem and after much careful measuring and discussion declared that they could use the eBay bargain, that is was more than man enough for the job, and would entail adapting one of the existing toggles using a machine press (see below). This would leave us with a forestay almost 1cm shorter than we had – but we’ll just ease the backstay tensioner – we’re not racers!
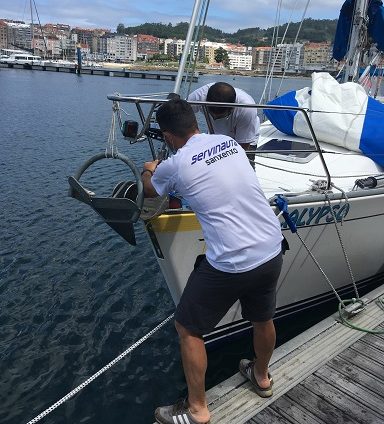
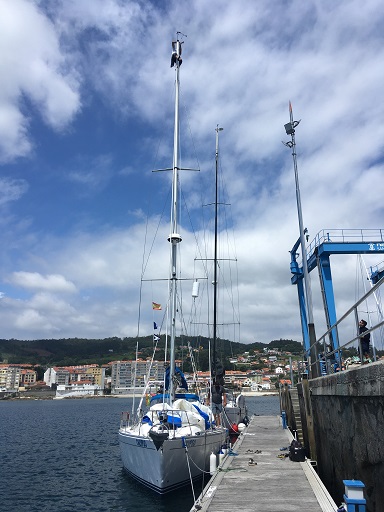
The work could be done alongside inside Sanxenxo marina as it is so well sheltered. A steady hand and a steady boat was needed.
So when we returned Calypso’s bow was pulled in to the pontoon and the guys got started, promptly at the agreed time.
First job was to slacken the rigging stays and tighten up the genoa and spinnaker halyards to the aforementioned Witchard shackle before removing the pin attaching the forestay to the tang and tying forestay and furler to one side.
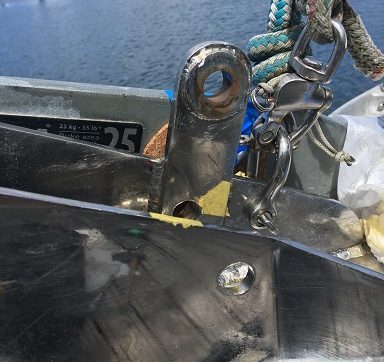
Then a new hole was drilled through the port stemhead fitting cheek and through the central double thickness webbing plus tang. Drilling a large hole through a good thickness of stainless steel is a time consuming process – involving increasing diameter cobalt drill bits, using a slow drill speed and plenty of machine oil. This was the longest stage in the process.
The offending tang is clearly seen in this photograph, standing above the central web to which it is welded………….
…………and the next job was to cut it off.
After which the raw edge and holes were cleaned up and polished.
There was a lot of oil and swarf around and we were pleased that Francisco and Luigi had covered the bow with a large blanket and had a full roll of paper towel which they repeatedly used to clear the mess.
And then the toggle that fits to the bottom of the furling drum (see top photo) was put in the machine press and adapted to fit inside the jaws of the new (eBay) fitting.
The forestay was turned through 90 degrees to suit the new arrangement.
After the pressed toggle was attached to the furling drum a line was tied around it, taken through the Witchard shackle and back to a winch to pull the forestay into position to make the final attachment.
All that was left was to tighten back up the standing rigging and backstay tensioner, and that was it – job done!
We wouldn’t have fancied traveling down the Portuguese Atlantic coast relying on the dyneema failsafe and so now we are good to go, subject to checking out the rest of the rigging….
And Francisco and Luigi got straight to it.
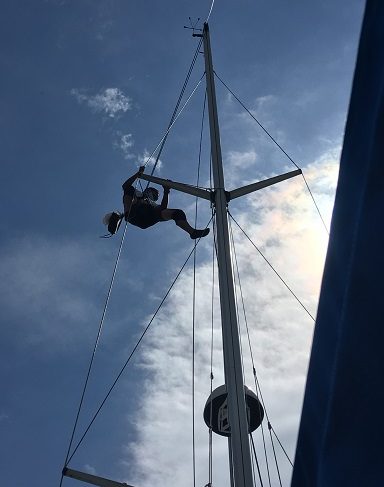
Firstly they called one of their colleagues over from the adjacent boatyard. We didn’t get his name, but he was a well built chappy, nicknamed “the electric winch”. And it was obvious why – taking him little effort to sweat the halyard at the mast, quickly taking Luigi to the top.
He started his inspection there, descending the mast with Francisco controlling the main line and Paul controlling the safety line.
Luigi undertook a very thorough inspection of every component of the mast, turning blocks and rigging. He even inspected the rivets at the mast joint!
He started by replacing the wind no-go zone indicators at the top of the mast, lubricating the windex, adding cable ties to the vhf cable (maybe the old ones were solar degraded, we didn’t ask), and he came down the mast slowly, assessing and lubricating as he went.
In the end he confirmed that everything was in very good condition and that the only thing that slightly puzzled him was the way that the topping lift exited the top of the mast – usually over a turning block and straight down, but in our case taken slightly further aft and over a captive horizontal stainless bar.
He drew it on paper and we agreed that it was nothing to worry about, just slightly unusual.
What we feared could have been a very expensive day ended up costing us a little over 500 euro plus the £20 part. We were please that we had found a professional and competent company to carry out the work at a fair price, very quickly after we had first contacted them, and at exactly the time we had agreed.
Now we can go sailing again; many thanks Francisco, Luigi and Servi Nauta